Category Archives: Computers

How to enable MaxCDN for a WordPress web site

A necessary disclosure: some of the links in this article contain our affiliate information. It means that if you follow such links and order a service from the company, we may receive a small commission from them for sending them a customer (you). Keep in mind, however, that we don’t give the recommendations just because of the commission, we only recommend our partners because they are extremely good at what they do: we use their services ourselves!


If you have a WordPress-powered web site and you want to finally jump on that CDN bandwagon everyone is talking about, it’s very easy to set up.

If you lived under a rock during the last few years and don’t know why would you need a CDN (Content Delivery Network), here is an elevator pitch: the CDN lets you speed up the delivery of the static files (such as the images, CSS, JavaScript) and make your web site respond faster. And a faster web site is good not only for your human visitors, but also for the SEO (the faster your web site, the better it will rank in the Google search results.)

One of the more popular CDN providers is MaxCDN, which we’ve been using for our primary web site WinAbility.com for about a year now, and are very happy about. It offers a control panel that you can use to set everything up manually, but if your web site is running on WordPress, there is a WordPress plugin that does all the necessary configuration for you. Here is what to do, step, by step:

0. (Optional) If you are familiar with HTML and want to see exactly what CDN would do to the HTML code of your web pages, you may want to save the page source of your main page, to be able to compare it with the new code after enabling the CDN. Here is how the HTML source of this web site (softblog.com) looked like before we have enabled the CDN for it:

The page source before enabling MaxCDN

The page source before enabling MaxCDN

1. Open an account with MaxCDN. It’s easy and free, and they offer a free trial. There is also a 25% off offer for the new customers, if you want to take advantage of that.

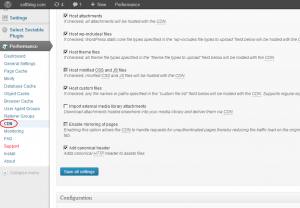
2. Install the W3 Total Cache plugin into your WordPress site. After you activate it, it will add some speed to your site out of the box, and one of the options it offers on its menu is the CDN integration:

Total Cache plugin offers the CDN option on its menu

Total Cache plugin offers the CDN option on its menu

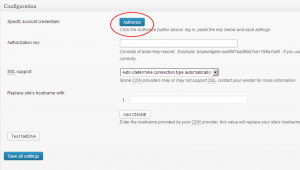
3. Select CDN from the menu on the left, and Total Cache should ask you to autorize access to your MaxCDN account:

Authorize access to the MaxCDN account

Authorize access to the MaxCDN account

Press the Authorize button, and you will be taken directly to a special web page at MaxCDN with your authorization key pre-formatted. Copy it, go back to your WordPress admin panel, and paste it there. Press the Save all settings button, and on to the final step:

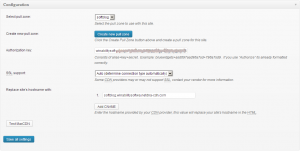
Create and select a pull zone to serve your files from the CDN

Create and select a pull zone to serve your files from the CDN

4. Create a pull zone (by pressing the Create pull zone button, of course):

Create a pull zone

Create a pull zone

What is a pull zone, you might ask? Think of it as a special CDN service that pulls files from your main server and delivers them to the end user when the user is opening your web page. MaxCDN also supports the push zones, which work in about the same way as the FTP servers, but we won’t use them here for now.

Anyway, for this web site (softblog.com) I have entered softblog as the name for the pull zone, to distinguish it from other pull zones I have previously created for other web sites. After the zone is created, make sure it is selected on the CDN page of the Total Cache plugin, as shown above. Press Save all settings button once again, and your CDN is now set up!

If something is wrong, look at the top of your WordPress admin page: Total Cache is good about detecting problems and telling you exactly what to do to fix them. If no problems are reported, congratulations, all done, your WordPress site now uses MaxCDN!

5. (Optional) Look at the page source of your web site again; ours has the following:

Page source after MaxCDN is configured and enabled

Page source after MaxCDN is configured and enabled

Compare it with the page source you obtained before enabling MaxCDN, see the difference? The CSS file is now served from the CDN pull zone. The same should be true for other static files and images. From now on, if someone from the other half of the globe opens your web page, they don’t need to wait for the static files to travel all around the world to reach them, MaxCDN will deliver the files to the user’s browser from the closest location.

Happy word pressing!

Solution for the slow network for Virtual PC on Windows 7

(Note: the following is a long version of the story. If you want the short version, just the solution, skip to the last paragraph below.)

As I wrote before, I use virtual machines extensively to do work on my computer. I used Windows XP Pro as the host OS for several years now, and it worked quite well. I skipped Vista and kept using XP, mainly because it did not seem like Vista would add any significant benefits to my host computer. However, a few months ago, Windows 7 became available, and while testing my products with it, I was so impressed with its speed, stability, the look and feel, that I decided it was time to upgrade my main host computer to Windows 7.

So, a week or so ago, after backing everything up, I took the plunge and installed a fresh copy of Windows 7 Ultimate. It went well, I was happy. Of course the first application I added to it was Virtual PC, because I needed it to run my virtual machines that do the real work for me. It went well, except for a few surprises, such as the new user interface of the Virtual PC console, that looked like a regular folder rather than a separate program. Also, it upgraded the integration components of my virtual machines and as a result it started using the Remote Desktop to display the virtual machine desktop. It added the ability for the virtual machines to recognize the USB drives attached to the host, but at the same time it downgraded the display capability of the virtual machine to display 16-bit colors only, that caused the fonts on the virtual displays not to be anti-aliased quite as nicely as before.

Those were minor things, though, and after trying my virtual machines for a couple of days, I decided I could live with the new version of Virtual PC. One thing did bother me, though: when I tried to browse the shared network folders from within the virtual machines, the browsing was quite slow. Literally, it took a few seconds just to navigate from a directory to a subdirectory. It was especially bad if the directories contained a lot of files. Copying files over the network was painfully slow, too. However, the network was slow only when using it from within the virtual machines. Outside, the network was as fast as it was before: I could browse the virtual machines from my host computer, and connect to other “real” computers from it, the speed was as usual.

I searched the web and found a few reports from people describing the same problem, but no real solution. The only suggestion was to replace the new version of Virtual PC software with the previous one, Virtual PC 2007. Although Microsoft does not officially support Virtual PC 2007 on Windows 7, a few posts I found suggested that it was quite possible to install and use VPC 2007 on Windows 7.

After contemplating it a bit, I decided that having fast network access from within the virtual machines was worth the trouble and did just that: uninstalled the new Virtual PC, and installed the previous VPC 2007 with SP1. The good news was that even though the virtual machines were previously updated with the new version of the integration components, they kept working well with VPC 2007, as before: the full 32-bit colors of the display were available, the old console window was back, and most importantly, the network access was as fast as before.

I was happy for a couple of days, until I noticed a strange problem happening: after using the virtual machines for some time, while switching back and forth between them and the host computer, at some point the virtual machines would stop accepting the TAB and ESC keys. That was a new problem that I did not experience before. Again, I started searching the web for a solution, and found a couple of suggestions, such as the one about creating a local security policy for the file VPCKeyboard.dll, but none of the suggestions worked: after several minutes, the TAB and ESC keys would stop working in the virtual machines (all of them at once), and the only way to restore them was to shut down all virtual machines, and restart the Virtual PC console application. Then work for a few minutes and do the restart again. Needless to say, that was extremely annoying.

Having spent two days trying every possible thing I could come up with, including searching for the updated drivers, reinstalling the virtual machine additions, trying alternative ALT+TAB managers, turning the Aero theme on and off, and so on, I decided that having the slow network was not as bad as it seemed after all. I removed VPC 2007, and reinstalled the new version of Virtual PC software.  The TAB/ESC keys problem went away, the slow network access returned, and I started searching the web for a solution again. Accidentally, I came across of an old Microsoft support article that applied to Virtual PC 2004 and Virtual Server 2005, that mentioned a solution to a problem of a slow network access similar to what I’ve experienced. Out of desperation, I decide to give it a try, and … it worked! I guess, this problem was fixed in VPC 2007, but resurrected in the new version of Virtual PC (the old bugs are had to die, it seems). Anyway, here is what solved the slow network access in Virtual PC for me (from the Microsoft support article , Method 2):

– On the host computer,  backup the Registry, just in case, and then:

– Run Registry Editor (regedit.exe) and select the following key:

HKEY_LOCAL_MACHINE\SYSTEM\CurrentControlSet\Services\Tcpip\Parameters

– Create new DWORD value named DisableTaskOffload and set its value to 1.

– Restart the computer.

After I did the above, the network speed from within the virtual machines became as fast as it was before. Hope this helps someone!

Did you know? Our USB Encryption Software can protect any USB flash drive or any other external drive with a password and strong encryption. Try it free for 30 days! Read more…

Getting online in New Zealand

It’s March of 2009 and I’m in New Zealand, on a month-long expedition, driving from town to town, ferrying from island to island, trying to understand what kind of country it is. (I like it so far! Except for the sand flies.) As you can imagine, keeping connected to the Internet is critical for my kind of business: I need to get online at least once or twice a day, or face a wave of angry messages from my customers. My trip coming to an end soon, and since I’ve been through quite a few of different places, I thought I would share my findings here, hopefully someone would find it of use when traveling to NZ.

Most cafes and hotels I stayed had computers in their lobbies with an Internet connection. If your online needs are modest (like you need to check your Gmail account, browse the web, or talk to someone via Skype), such computers should do just fine. Many have the coin slots attached, and for about NZ$2 per 20 or 30 minutes you can get online. The problem with such computers is that usually quite a few people want to use them, and you may spend some time waiting in line. The big advantage though is that you don’t need to bring your laptop with you, which could be important if you are traveling light.

Myself, I needed to bring my laptop with me, because it’s an integrated part of my business: I need it to access my customer’s database, and I also need to have at least a light version of my development environment in case a need for a quick bug fix arises. It means that taking the easy road and using the online computers I described above was not an option: I needed the full wireless access to the Internet.

Most hotels did offer the wi-fi access option, but not all: you better ask specifically about the wireless Internet availability before committing to the place. Keep in mind that even if a hotel advertises the wi-fi option, it does not necessarily mean it is actually available: in more than one place the wi-fi router was online but had trouble accepting connections. More than once I had to ask for a refund of the fee I paid and go search for the better wi-fi signal in the nearby cafes.

The common wireless access providers that I’ve encountered in more than one place were as follows:

Zenbu

This provider charges for the bandwidth rather than for the connection time. At first I was not sure how much bandwidth I would need, it seemed like the usual 50MB that you could buy for NZ$5 was not a lot. Turned out that was the most economical access that I encountered. To minimize the bandwidth I turned off the automatic Windows and anti-virus updates, shut down various programs that maintain constant Internet connection (Skype, RSS reader, etc.) and kept active only the actual programs I needed at that time. In such a mode, I was consuming less than 10MB per hour, doing just email checking and light web browsing. However, when I needed to talk to someone via Skype, the consumption quickly rose to about 1MB per minute. Still, it was pretty cheap.

One thing to keep in mind about Zenbu is that if you buy your access ticket at the reception, you can use that ticket only at that specific place, you cannot roll it over to another location. However, if you pay directly to Zenbu via their web site, you can use that bandwidth at any location.

The Internet Access Company, The Internet Kiosk, SiteWifi

These providers charge for the time used (they also have the bandwidth limits, but I have never reached them). The important thing about using them is not to forget to log off from the wireless access. This way, you can keep the remaining minutes and use them at another place serviced by the same provider. If you forget to log off, the minutes may keep rolling, even if you are not connected to the Internet anymore. These were not as economical as Zenbu, their prices were in the range between NZ$3 and NZ$8 per hour.

iPass

This was a complete waste of time. Before going on this trip, I tried to prepare myself: I’ve searched the Internet for the available Internet providers in NZ, and I came across the iPass service. From their web site it appeared like they had a lot of access points throughout New Zealand. They offered a Global Wi-Fi account for US$45.00/month with no commitment requirement, and it looked like a good thing to have. So the day before departure I opened an iPass account.

I had the first (and only) opportunity to use my iPass account in Auckland, at the Hyatt Regency hotel. I powered my laptop, opened the web browser, and indeed there was an option to login with my iPass account there. Unfortunately, my login name and password were not accepted. Having tried a few times, I gave up and went to a nearby cafe to connect via some other provider.

That happened to be the only place that I encountered that offered the iPass login option. None of the other places I stayed at had it available. So I contacted iPass about canceling the account and getting a refund. It took one email message and two phone calls, but I did receive the refund. Still, the iPass experience turned out to be just a waste of my time and energy. I guess I should take it easy and not get  ‘overprepared’ next time.

Private providers

Some of the places offered the private connection options, that is the time you buy there could be used only at that specific location and nowhere else. These were obviously the least flexible options, but what could you do if there was nothing else available. The prices usually were between NZ$3 and NZ$6 per hour, and one place offered 24-hour access for NZ$8, which was pretty good.

If the reception confirms that they do have a working wireless access point, it’s better not to hurry and buy the ticket at reception. Before doing that, I would usually try to connect from the laptop and see what kind of access was at that particular place. Chances were, the access would be provided by one of the common companies (see above) with which I’ve already opened an account at one of the previous places. If so, I could use the leftover minutes before paying for more time. Only if there was no option to connect and pay via the web browser I would go and buy the access time at the reception.

Happy connecting!

Did you know? Our USB Encryption Software can protect any USB flash drive or any other external drive with a password and strong encryption. Try it free for 30 days! Read more…

The first bug in Vista UAC?

(This post is moved here from the TweakUAC web site, were it appeared first on January 1st, 2007).

I believe I’ve stumbled upon the first bug in Vista UAC (in the final release of Vista, not in a beta version).

It’s very easy to see the bug in action:

  • Login to your computer with the Guest account. (You may need to enable the Guest account first, using the Control Panel).
  • Download any digitally signed program (such as TweakUAC), save it to the default download folder (C:\Users\Guest\Downloads).
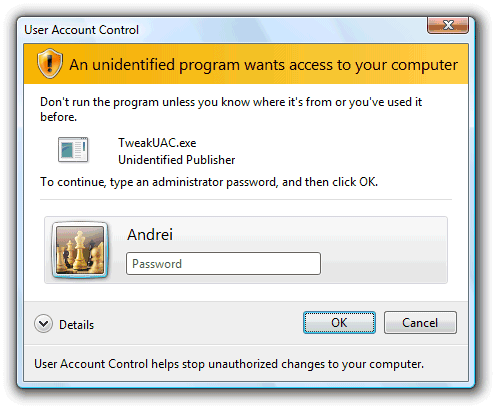
  • Now run the file you’ve just downloaded, and take a look at the elevation prompt displayed:

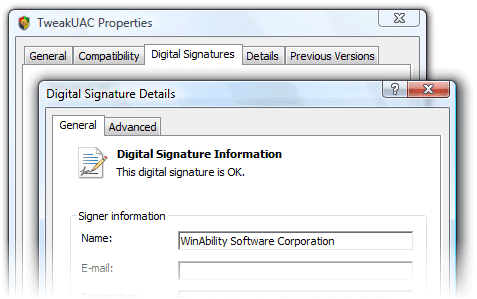
As you can see, UAC cannot recognize that the file contains a valid digital signature, and it warns you that the program is “unidentified”. This is a bug, because you can check that the digital signature of the file is actually valid:

This problem is not limited to the TweakUAC file, any other digitally signed executable (such as the installation utilities of most software packages) will produce the same effect. All you need to do to reproduce this bug is login to Vista with the Guest account and run a digitally signed file from the Guest\Downloads folder. Note that if you copy the executable into the C:\Program Files folder, and run the file from there, its digital signature would magically become recognizable by UAC! Move the file to the root folder C:\, and the file again becomes unidentified to UAC.

Is this bug dangerous? Yes, it is! The whole idea behind UAC is to shift the responsibility of distinguishing the bad programs from the good ones to the end user (you!). The only tool that UAC gives you in this regard is the digital signature information, and it turns out it’s broken! How are you supposed to make the decision whether to trust a certain program or not if UAC does not provide you with the correct information? (Nevermind, it’s a rhetorical question).

Andrei Belogortseff

WinAbility Software Corp.

Comments:

21 Responses to “The first bug in Vista UAC?”

  1. Myria Says:

    I believe that this is because there is an NTFS fork on the directory that says that anything in that directory shouldn’t be trusted. This is similar to XP in how it knows that a file was downloaded recently by IE.

  2. Soumitra Says:

    Hi Andrei,

    Have a quick question about TweakUAC. Can I suppress UAC messages only for a single application using TWeak? Or does it suppress all UAC messages, system wide?

    Thanks.

    Regards,

    Soumitra

  3. Andrei Belogortseff Says:

    Hi Soumitra,

    > Can I suppress UAC messages only for a single application using TWeak?

    No, it’s impossible.

    > Or does it suppress all UAC messages, system wide?

    Yes, that’s how it works.

    Andrei.

  4. Andrei Belogortseff Says:

    Hi Myria,

    > I believe that this is because there is an NTFS fork on the directory that says that anything in that directory shouldn’t be trusted. This is similar to XP in how it knows that a file was downloaded recently by IE.

    It may very well be so, but it does not make it any less of a bug. If a file contains a valid digital signature, Windows should not misrepresent it as coming from an unidentified publisher.

    Andrei.

  5. Chris Says:

    How did you take a screenshot of the UAC? I can’t get Print Screen to copy it to the clipboard, and the snipping tool isn’t working either.

  6. Andrei Belogortseff Says:

    Hi Chris,

    > How did you take a screenshot of the UAC? I can’t get Print Screen to copy it to the clipboard, and the snipping tool isn’t working either.

    Those tools don’t work because UAC displays its messages on the secure desktop, to which the “normal” user tools have no access. To solve this problem, I’ve changed the local security policy to make the UAC prompts to appear on the user’s desktop. After that, I used the regular Print Screen key to capture the screenshots.

    Hope this helps,

    Andrei.

  7. Matthew Bragg Says:

    Hi Andrei,

    I sell software to a *very* non-technical customer base. My setup procedure includes installation of an .ocx file into the \windows\system32 folder and registration of it using regsvr32. In order to copy anything into the \windows\system32 folder under Vista I have to turn off UAC. I would like to be able to do this automatically, programmatically, so I don’t have to make my users mess with UAC. I’d like to be able to turn off UAC for a second or two programmatically, then turn it back on. Will your software enable me to do that?

    Thanks

  8. Andrei Belogortseff Says:

    Hi Matthew,

    > I’d like to be able to turn off UAC for a second or two programmatically, then turn it back on.

    Unfortunately it’s impossible: if you enable or disable the UAC, Windows must be restarted before the change would have take effect.

    To solve your problem:

    > In order to copy anything into the \windows\system32 folder under Vista I have to turn off UAC.

    It looks like your setup process is executing non-elevated, that’s why it cannot do that. You may want to try to start it elevated and see if it would have solved the problem without turning off the UAC.

    HTH

    Andrei.

  9. caz Says:

    don’t use TweakUAC because this program makes your Vista unsafe!

  10. Herbys Says:

    > How are you supposed to make the decision whether to trust a certain program or not if UAC does not provide you with the correct information? (Nevermind, it’s a rhetorical question).

    The answer is you are not. A guest should not be allowed to make any decision about installing software. If you log on as a valid user, the prompt works just fine. If you log on as a guest, you shouldn’t be installing software, so any dire warning is fine.

    Yes, this might be unintended behavior (or perhaps it is not), but its impact is null.

  11. Andrei Belogortseff Says:

    Hi Herbys, you wrote:

    > The answer is you are not. A guest should not be allowed to make any decision about installing software.

    Sorry, but you are missing the point: the UAC displays this information for the _administrator_ to use and to make a decision, not for the guest user. The administrator is supposed to review the information and enter his or her password to approve the action. Take a look at the screenshot and see for yourself.

    > If you log on as a guest, you shouldn’t be installing software

    Why shouldn’t I? What if I want to install a program for use by the guests only? For example, I use only one web browser (IE), but I never know what browser a guest may want to use. So, being a good host :-) I want to install also Firefox and Opera, but I don’t want them to clutter my desktop, etc., I want them to be used by the guests only. To achieve that, I would log in to the guest account and install the additional browsers from there.

    > so any dire warning is fine.

    Wrong.

    > Yes, this might be unintended behavior (or perhaps it is not), but its impact is null.

    May be, may be not. In any case, it does not make it any less of a bug!

  12. Timothy Conner Says:

    Is there any plan to adapt your program into a Control Panel Applet? I think that would be very clever.

  13. Andrei Belogortseff Says:

    Hi Timothy, you wrote:

    > Is there any plan to adapt your program into a Control Panel Applet?

    No, we don’t have such plans at this time, sorry.

  14. Mike Says:

    Anyone know why Vista won’t let me rename any new folder?

    The permissions are all checked for me as administrator, still I get an error message, “folder does not exist”. I can put things in folder and move it, but can’t rename it?

  15. Bob Says:

    To be honest, I have always thought that digitally signing was merely a way of generating more revenue. It doesn’t offer you any more security and windows will always moan at you regardless of an application having a signature or not.

    Even if your application has the “all powerful” and completely unnecessary Windows Logo certification, it still offers nothing to you as a user other than the reassurance that the person/s developing the software has allot of spare cash.

  16. Thomas Says:

    Bob Said:

    > To be honest, I have always thought that digitally signing was merely a way of generating more revenue.

    I have to agree. I’ve heard the argument of how it’s all designed to protect users from malicious software, and that’s all well and good as far as that goes — but since Vista, and most mobile OSes, don’t offer a way for users to say “okay, I understand the risk, I accept full responsibility, please go ahead and run this unsigned application without restrictions, and never bother me again when I try to run this application”… That makes it pretty clear it’s just a racket initiated by VeriSign and the like, and happily endorsed by Microsoft.

  17. Andrew Says:

    This is not a bug.

    The first screen shot shows that Windows doesn’t trust the identity contained in the certificate. In other words, “I can read this, but I don’t know if I should trust the person who wrote it.”

    The second screen shot just shows that the certificate is well-formed, that Windows can understand the information contained within it. It says nothing about what Windows will do with that information.

    Who did you did you pay to sign the certificate for you? If they’re not someone with a well-established reputation, then I don’t WANT my computer to automatically trust them.

    It’s just like how web browsers automatically trust SSL certificates signed by Thawte or Verisign, but will ask you before accepting a certificate from Andy’s Shady Overnight Certificate Company. As always, it’s a balancing act between usability and security.

  18. Andrei Belogortseff Says:

    Andrew, you wrote:

    > This is not a bug.

    OK, there is a fine line between a bug and a feature, let’s assume for a moment that it’s a feature rather than a bug. If so, what benefit is this feature supposed to provide? As the second screen shows, the file is digitally signed, and Vista can detect that. Yet, it shows the publisher as “unidentified” on the first screen. Note also (as I mentioned in the post), that if you move the file to one a few specific folders (such as C:/Program files), Vista would magically begin to recognize the publisher. Move the file to some other folder, and it’s unidentified again.

    If you can explain why they designed it that way, I would agree with you. Until then, it’s a bug. Guilty until proven innocent!

    > Who did you pay to sign the certificate for you?

    That particular file was signed with a Verisign certificate, but the same problem occurs with _any_ file, signed with _any_ certificate. Try it yourself and you will see.

  19. Farthen Says:

    I think that it occurs because of IE7 protected mode – see http://victor-youngun.blogspot.com/2008/03/internet-explorer-7-protected-mode-vs.html, it’s a guide to run firefox in protected mode, and this explains very good how the protected mode works… the prompt is because the “Download” Folder is a protected folder (level “low”) and I think it only displays at the guest, because Windows forces UAC to display certificate in normal user mode in “low” level folders, but NOT for the MUCH MORE RESTRICTED “guest” account. This would be my explanaition.

    It doesn’t mean that I like it how Microsoft handels this but this would eventually explain WHY the warning appears sometimes and sometimes not.

  20. Farthen Says:

    sorry, in my last post there is a comma in the link, the correct link is:

    http://victor-youngun.blogspot.com/2008/03/internet-explorer-7-protected-mode-vs.html

  21. Andrei Belogortseff Says:

    Farthen: thank you for the information and explanation!

Making Vista play nice with XP on a network

While testing my software for compatibility with Windows Vista during the last couple of years I’ve noticed that Vista often does not want to play nice with other computers on my LAN. If there are only XP computers connected, everything was fine: they could see each other, I could move files between their shared folders, etc., no problems. However, should I start a computer with Windows Vista on it, more often than not that computer would not connect to others. When that happened in the past, I usually was in the middle of some other work that I did not want to interrupt, so I would just move the files using a USB flash drive and be done with it. When it happened yesterday, however, I was fed up with it and decided to get to the root of the problem.

The problem was, when I opened the Network folder on the Vista computer, I could see all other computers on the same LAN, as it was supposed to be. However, an attempt to open any of them would either present me with a login box (and no user name and password I tried would let me connect to that computer), or an error message would appear saying “Windows cannot access \\DEV. Check the spelling of the name…”, (where DEV is another computer on the LAN running XP) with the error code 0x80070035 “The network path was not found”. Pressing the Diagnose button would result in the message “DEV is not a valid host name”. Which kind of did not make sense because DEV did show up in the Network folder.

I’ve spent a couple of hours googling around and trying every troubleshooting suggestion I could find, like:

  • Is the name of the workroup correct?
  • If Network discovery and File sharing enabled?
  • Is there something to share from the Vista computer (like a folder on its hard drive)?
  • Does turning the firewall temporarily off make a difference?
  • Does rebooting the Vista computer help?

Nothing helped, the Vista computer could not connect to others. After googling some more, I’ve found the solution. (Ironically, it’s a suggestion for the Linux users, but it worked for me, too):

  1. Open the Local Security Policy console (it’s on the Start – Administrative Tools menu)
  2. Navigate to Local Policy – Security Options
  3. Locate the entry named “Network security: LAN Manager authentication level”
  4. Change the value to “Send LM and NTLM responses”

After I did that, the Vista computer magically started to recognize the presence of other computers and connect to them, just like XP computers always did.

What exactly did the policy change do? It allowed Vista to use a less strong network authentication protocol. Why was it necessary? Apparently, my router (Buffalo AirStation) that runs a variation of Linux, does not provide full support for the NTLM authentication. It is it dangerous to allow the LM responses? It would be dangerous if I allowed unknown persons to plug into my LAN and eavesdrop on the traffic (by doing that they could recover my Windows password), but no one but me is connecting to my LAN. I have to make a note to myself: when I upgrade the router, I need to try to turn off the LM responses on all computers and see if my network would work OK.

Hope this helps someone.

Update: (September 8, 2008)

If you have one of the Home editions of Vista that doesn’t come with the Local Security Policy tool, you can change this policy manually with the Registry Editor: navigate to the key HKEY_LOCAL_MACHINE\SYSTEM\CurrentControlSet\Control\Lsa, and set the REG_DWORD value named LmCompatibilityLevel to 0. This is equivalent to setting the “Send LM and NTLM responses” value as described above.

How to create a shared clipboard and copy and paste text between computers with ease

(It’s been a very busy time here lately: the taxes, a new product that’s almost done, but just can’t quite get finished, and as a result, no spare time for this blog of mine. Dear Subscribers (both of you), I’m very sorry, please don’t give up on me, I’ll try to post more often here in the future. OK, I want to finish my new product first, and then I’ll try to post more often. I promise :-) ).

Anyway, today I’ll write about a neat way of creating a “shared” clipboard on your LAN, to be able to quickly send pieces of text between computers just as easily as pressing Ctrl+C and Ctrl+V.

Not sure what I mean? Suppose you have several computers connected into a LAN, and you need to copy some text on one computer and paste into another, how would you do it? For instance, most of the time I browse the Internet with my laptop. If I encounter a download link to an interesting program, I want to try it, but I don’t want to install it on the laptop itself (I’m very selective about what gets installed where), I want to download it to my test computer and try it out there first. So I need to copy the web address from the web browser running on the laptop, and paste that address into the web browser running on the test computer. If it were the same computer, the procedure would be extremely easy: Ctrl+C, then Ctrl+V, and that’s all. But if I do Ctrl+C on one computer and then Ctrl+V on another one, it does not work the way I want, because the second computer has its own clipboard, independent of the clipboard the first computer has.

To solve this problem, I need to create a “shared” clipboard. In the past I used a little utility called Netclip, that did that for me: it used a shared folder as the storage for the shared clipboard, and whenever I wanted to copy something across the network, I would press Ctrl+Alt+C, to copy, and then moved to the second computer, pressed Ctrl+Alt+V there, and that would paste the result there. It worked well for years, but then Vista came along, and Netclip stopped working with it (and it did not seem like the Netclip developers were around anymore to release a new Vista-compatible version). So I started searching for a replacement, and tried a few other similar utilities, claiming the ability to share the clipboard between several computers. Unfortunately, none of them worked well.

Finally, some time ago I encountered a free tool called AutoHotkey (it’s a pity I did not discover it earlier, it would have saved me quite a lot of keystokes). In a nutshell, Aut0Hotkey enables you to create scripts to be executed when certain keys are pressed. There are plenty of examples at their web site of the scripts doing a lot of different things, check it out!

One of the first things I tried with AutoHotkey was to write a script that would emulate the functionality of the Netclip utility.The idea was as follows: I would set up a shared folder on one my computers that is turned on most of the time. Then I would set up two hot keys, one (Win+C) to copy whatever was currently selected to a file located in the shared folder, and the second key (Win+V) to read information from that file, and paste it into the clipboard.

After looking into the sample AutoHotkey scripts, I came up with the following script to emulate Netclip:

--- begin netclip.ahk ----

path := "\\your_computer\your_shared_folder\netclip.txt"
#C:: ; Win+C

AutoTrim Off  ; Retain any leading and trailing whitespace on the clipboard.

FileDelete, %path%
if (ErrorLevel > 0 ) ; could not delete the file
{
 MsgBox FileDelete failed for %path%
 return
}

Send ^c	; copy whatever it is to the clipboard
FileAppend, %ClipboardAll%, %path%

if (ErrorLevel > 0 ) ; could not write the file
{
 MsgBox FileAppend failed for %path%
 return
}
return

#V::	; Win+V

FileRead, Clipboard, *c %path%

if (ErrorLevel > 0 ) ; could not read the file
{
 MsgBox FileRead failed for %path%
 return
}

Send ^v	; paste whatever it is from the clipboard
return

--- end netclip.ahk ----

To use this script, copy the code between the dashed lines and save it to a text file named netclip.ahk (or whatever you want to name it, but keep its extension .ahk). The only thing that you need to modify in the script is the variable path that contains the location of the shared file to be used for the storage, at the very top of the script. Make sure the shared folder you use for storage is writable from other computers on your LAN.

If you have not done it yet, install AutoHotkey on each computer, and copy the script to each computer, too  (or put it into the shared folder itself). Create a shortcut to the script, and use it whenever you want to activate the shared clipboard. If you want it to be always active, add the shortcut to your Programs – Startup folder.
Now, whenever you want to copy some text to the shared clipboard, select it just as you would for the regular copy, but instead of Ctrl+C press Win+C. To paste it into another computer, go to that computer and instead of the usual Ctrt+V press Win+V. Yes, it’s that easy :-)

It works well for me, I hope it will work just as well for you, too. Happy copy-pasting, bye till next time. I’m off to finish my new product (stay tuned!).

The Hunt For Blue Screen

This story began about 15 months ago, in November 2006. That was the time when Microsoft was getting very close to releasing Windows Vista, and it was the time for me to start getting serious about making sure my applications were compatible with it.

At that time I was using two computers for the development and testing, one with two single-core Intel processors, and another one with one single-core AMD x64 processor. Both were set up for development and testing of my programs: I was using the first one to test the 32-bit versions, and the second one to test the 64-bit editions of my programs. Since many people reported that Vista was more hardware hungry than XP, I thought it was a good occasion for me to also get a more powerful computer that would run Vista reasonably well. So I bought a new Core 2 Duo (dual core) processor, a motherboard to support it (P5L-MX from ASUS), a new video card to support the Aero user interface of Vista, put them together in a spare computer case I had, loaded up Vista Release Candidate on it, and started working on porting my applications to Vista.

It all went well for a while, except every couple of days or so my new powerful computer would once of a sudden “blue screen” and reboot.

After it happened a few times, I fired up WinDbg and loaded a few latest minidumps into it. They indicated that the crashes were happening in the FASTFAT.SYS driver, and the common reason for the errors was IRQL_NOT_LESS_OR_EQUAL, a common reason for a crash caused by a sloppily written device driver. It seemed like a bug in the FASTFAT.SYS driver shipped with the pre-release version of Vista. I decided there was not much I could do but hope that the bug would be fixed in the final (RTM) Vista release.

A couple of months later the RTM release of Vista became available, so I’ve reformatted the hard drive to get rid of the release candidate of Vista, installed a fresh copy of Vista RTM on it, and started using it.

In a day or two the same crashes started to happen again.

Figuring Microsoft would not release a new version of Vista with a buggy version of such an important driver as FASTFAT.SYS, I started looking for another reason. What made it difficult was that the blue screens appeared not very often, sometimes a week would go by and I started to hope I finally found out the reason, but inevitably, it would crash again no matter what I tried. And I tried a plenty:

I vacuumed the inside of the case and reseated the processor and the RAM modules.

The blue screens kept happening.

I ran the memtest program to check the RAM for errors for a few hours, it did not find any problems with the RAM.

The blue screens kept happening.

I installed the SpeedFan program to monitor the temperature of the hardware components. Although it did not show an overheating, I added another fan to the case.

The blue screens kept happening.

I’ve replaced the video card with another one.

The blue screens kept happening.

I’ve bought a new SATA hard drive (previously I was using an old IDE drive), and moved the Vista installation to it.

The blue screens kept happening.

I thought that maybe I got a faulty motherboard, so I bought a new one, this time P5LD2, again from ASUS. I also picked up another Core 2 Duo processor and a new set of RAM modules to go with it. I reinstalled Vista RTM from scratch, and set up my development environment, and started working as usual.

The blue screens kept happening.

As you can see, at that point I already had two computers which were giving me the blue screens every couple of days or so. I ran out of the new theories about the reason for the crashes, and I returned to the one I started with: the bug was probably in the FASTFAT driver of Vista after all, maybe I should have waited till Vista SP1 was out before switching to Vista as my main development platform. I started thinking about switching back to Windows XP. It so happened that at that time (in September 2007) I was locked out of both of my Vista computers by the buggy Genuine Advantage code of Windows Vista (I plan to share that experience of mine in a separate post, later on, stay tuned). That made the decision to switch back to XP real easy.

I was using Windows XP for several years, and never had a problem like that before, so imagine my surprise that after I’ve reinstalled Windows XP on each of my new computers, the blue screens started to happen almost from the day one. As before, they were occurring in the FASTFAT.SYS driver. It made it clear for me that I was blaming Vista in vain, it did not introduce a new bug, or, at least, if the bug was there, it was not Vista-specific.

I started analyzing the similarities between the two new computers, hoping that would give me a clue. They had different motherboards (although from the same manufacturer), slightly different processors, different RAM modules, different video cards, different hard drives (one was using a WD SATA drive, another one a Maxtor IDE drive). I came up with the idea that maybe I got very unlucky and I got two faulty motherboards. Luckily, at that time the built-in network adapter on one of the motherboards died, and I took this opportunity to RMA the motherboard back to ASUS. I got the replacement back in a few days, and installed it.

The blue screens kept happening.

Thinking that getting three faulty motherboards in a row was very unlikely, I started to try other things. Even though my two old computers were plugged in the same UPS device as the new ones and were working just fine, I thought maybe the new computers were more sensitive to the quality of the power they were getting.

I replaced a cheapo generic power supply in one of the new computers with a considerably more expensive and supposedly better one from Antec.

The blue screens kept happening.

I bought a new, more powerful UPS, specifically for use by the new computers.

The blue screens kept happening.

Out of desperation, I started all over and repeated every troubleshooting step I did before, with each of the crashing systems: reseated the modules, replaced the cables, ran the memtest.

The blue screens kept happening.

At that point, about a month ago, I ran out of ideas. I was ready to surrender and just live with it. Or maybe throw out both of the new computers I’ve built and buy a completely new one, and I was seriously contemplating that, when on January 15 it hit me: what that FASTFAT.SYS driver was doing there anyway? All of my hard drives have been formatted with the NTFS file system, I didn’t remember formatting a drive with the FAT or FAT32 system recently. Why would Windows load the FASTFAT driver?

I reviewed the properties of the drives listed in My Computer, and sure enough, there was one of them formatted with the FAT32 system. It was a virtual encrypted drive I created a while back with the TrueCrypt software. I used the drive as a backup place for sensitive files of mine. Periodically, I would burn the image to a DVD-R disc, to make a backup of it. And yes, there was a copy of this image on each of the new computers experiencing the crashes.

I reformatted the encrypted volumes with the NTFS file system.

The blue screens stopped.

It’s been almost a month since I’ve made the last change, and I have not had a single blue screen. Previously, they were happening every couple of days. I’m very confident now that I’ve found the culprit that caused me so much grief. I believe the following list describes the common conditions for the blue screens to occur:

  1. The computer should have a multi-core processor, such as Intel Core 2 Duo.
  2. The computer should have TrueCrypt 4.3a installed, and there should be an encrypted FAT32 volume mounted.

Why do I think the first condition is important? Because previously I was using TrueCrypt with FAT32 virtual drives for several years on the computers that had single-core processors, and never experienced such crashes with them. Only when I switched to the Core 2 Duo processors the crashes started to occur.

I’ve looked through the source code of TrueCrypt 4.3a and noticed that its driver was compiled with the NT_UP switch in its Makefile. This is definitely wrong. It means that the driver was targeted at the uni-processor systems. Since the multi-core processors are essentially multi-processors, defining NT_UP means asking for trouble.

Why did the crashes stopped after I’ve reformatted the encrypted drives with the NTFS file system? I don’t know. Apparently the NTFS file system driver is more robust and can tolerate the imperfect drivers such as the ones compiled with the NT_UP switch. Why didn’t I get crashes with my old two-processor computer? Again, I don’t know. Maybe the old computer was not fast enough for the error conditions to occur so frequently, and when it did crash once in a blue moon, I just dismissed that as something insignificant and did not pay attention to it.

Now, I noticed that a few days ago a new version of TrueCrypt 5.0 had been released. It uses a new driver build procedure, that does not seem to have the NT_UP flag anymore. This is good. However, looking through their support forums it seems like the new version introduced quite a few new bugs. I guess I’ll postpone upgrading to it until version 5.1 comes out. I want to get some rest from the blue screens for awhile :-)

Update: April 15, 2008

A few days ago I decided to try the latest release of TrueCrypt, 5.1a. I reformatted the NTFS encrypted volume back to FAT32 and the blue screens started to occur almost immediately. After two days of bluescreening, I reformatted the volume back to NTFS, and the blue screens stopped. It looks like TrueCrypt 5.1a still causes this problem. HTH.

Update: May 13, 2008

A week ago I started another experiment : connected a spare hard drive about the same size as the TrueCrypt volume I use, formatted the hard drive with the FAT32 system (just like the TrueCrypt volume that was giving me the blue screens), and copied everything from the encrypted volume to that hard drive. Then I dismounted the TrueCrypt volume, and assigned its drive letter to the hard drive I’ve just attached. Restarted the computer and kept using it as before, the only difference was that instead of a FAT32-formatted encrypted volume I was now using a regular FAT32-formatted unencrypted hard drive. A week passed by, no blue screens. Today I copied everything back from the hard drive to the FAT32-formatted TrueCrypt volume, and disconnected the extra hard drive. About an hour later a blue screen occurred. I think that proves conclusively that TrueCrypt is the real culprit behind these blue screens. HTH.

Update: July 16, 2008.

A week ago I’ve installed a new version 6.0a of TrueCrypt. One of the new things in it was an updated device driver with the improved support for the multi-core processors. That gave me the hope that this version might have finally fixed this bug. For a week it was running  smooth, no BSoDs, even though I’ve switched to using a FAT-formatted encrypted volume. I was thinking about reporting success here, but today – boom, blue screen with IRQL_NOT_LESS_OR_EQUAL status in fastfat.sys.  So I’m switching back to the NTFS volume and reporting for now that version 6.0a of TrueCrypt still has not fixed this problem. HTH.

Did you know? Our USB Encryption Software can protect any USB flash drive or any other external drive with a password and strong encryption. Try it free for 30 days! Read more…